Sunday, December 15, 2013

Memasang Meta Tag Deskripsi dan Keyword di Blog

meta tag deskripsi dan keywords

Cara memasang deskripsi dan keyword blog  untuk optimasi SEO.  Nah pada artikel yang lalu saya menjelaskan tentang bagaimana mengecek ranking SEO pada blog. Ketika melakukan pengecekan deskripsi dan keyword merupakan hal sangat berpengaruh, sehingga jika tidak memasang salah satu dari itu akan sangat menurunkan peringkat seo blog. Hal itupun terjadi ketika saya mengecek rangking seo blog ini dan ternyata hasilnya sangat mengecewakan heheh. Tapi setelah ditambah deskripsi dan keyword lumayanlah peningkatannya :D.

Langsung saja ya, untuk memasang descripsi dan keyword pada blog kita menggunakan meta tag. Bingung dengan apa itu meta tag heheh ni baca penjelasan dari Wikipedia tentang meta tag “Meta adalah elemen atau tag dalam bahasa pemrograman HTML atau XHTML yang berfungsi sebagai penyampai informasi metadata dari sebuah halaman web. Elemen meta ini harus diletakkan pada bagian “head” dalam HTML tersebut. Tag meta ini dapat dipakai juga untuk menyatakan deskripsi/keterangan dari suatu halaman web dan untuk menjelaskan mengenai kata kunci (keyword) yang terkait serta untuk metadata lain tanpa “head”. Secara umum, terdapat beberapa macam meta tag dengan fungsi yang berbeda. Beberapa fungsi tersebut misalnya meta keywords dan description”.

Untuk memasang deskripsi dan keyword masuk ke dasbor blog – template – edit html, kemudian copy code dibawah ini dan tempatkan diantara tag <head> dan </head>. Terserah mau ditempati diatas </head> atau tepat dibawah <head> yang penting diantara kedua tag tersebut :D

<b:if cond='data:blog.url == data:blog.homepageUrl'>
<meta content='Blog yang membahas tentang tutorial internet, drupal, animasi, web, css, blog dan tips dan trik' name='description'/>
<meta content='Tutorial, cara, hotspot, mikrotik, drupal, css, web, website, blog, ms word, ms excel, animasi, membuat, windows, software, download, google, bagaimana, modifikasi, tips dan trik, tips, trik, pengenalan, internet, ' name='keywords'/>
</b:if>

Meta tag dengan name description itulah meta tag untuk deskripsi blog anda dan meta tag dengan name keywords untuk keyword blog.  Ganti code yang berwarna merah tersebut sesuai dengan deskripsi blog anda pada bagian meta content dengan name description dan keyword blog anda  pada tulisan yang berwarna merah pada meta content dengan name keywords.


Selamat mencoba

Monday, December 9, 2013

Membuat Artikel Terkait atau Related Posts di Blog

cara membuat artikel terkait atau related posts di blog
Membuat artikel terkait atau related post pada blog. Nah satu lagi cara agar blog lebih powerfull yaitu dengan membuat artikel terkait pada akhir postingan blog. Yang dimaksud artikel terkait adalah artikel-artikel yang berkaitan dengan postingan yang muncul dan kaitannya berupa persamaan kategori atau label. Jadi pembuatan artikel terkait ini berdasarkan label pada blog. Ini berguna agar si pengunjung dapat lebih lama mengunjungi blog dengan melihat artikel artikel yang berkaitan.

Pada kesempatan yang berharga ini (ceramah mode on) saya akan membagi tips cara membuat artikel terkait dengan menggunakan logo atau icon yang berbeda, seperti  pada blog ini saya menggunakan icon favicon blog saya . Lebih jelasnya liat gambar diatas.

Baca Juga : Cara Menampilkan Widget di Halaman Tertentu Pada Blog

Logo atau gambar yang berada disamping judul-judul artikel pada gambar diatas, saya ambil dari link favicon pada blog saya. Jadi kelihatan lebih natural heheh kayak lagunya dmasiv yah.
Langsung saja pada step pertama copy code dibawah ini dan tempatkan diantara tag <head> dan </head>


Pada code diatas ganti url ini https://blogger.googleusercontent.com/img/b/R29vZ2xl/AVvXsEhDuDw5ecYWtmlYTYUb9aqUNPp98hqHYkFE9cFa3FThTgzlyScq4oRgKEl_78C1yP2-NatFETa28FWR9ZiyECpwuywMXQ-qzN8Z6ooD5U82CxJzk0OLM-vXCMML8x9BfwKt0Aw0rLJYB9QL/h120/favicon.icodengan alamat url favicon atau logo sobat agar gambar yang tampil disamping artikel tersebut adalah logo atau icon milik sobat sendiri. Jika menggunakan logo, gunakanlah logo dengan ukuran yang kecil seperti contoh.

Baca Juga : Cara Mengetaui Skor Atau Peringkat SEO Blog

Setelah menempatkan code diatas, sekarang copy code dibawah ini dan tempatkan dibawah  <data:post.body/>. Kalau diblog ini saya tempatkan pas dibawah code ini <b:if cond='data:blog.pageType == &quot;static_page&quot;'><data:post.body/></b:if>


Save template dan lihat hasilnya. Selamat mencoba

Sunday, December 8, 2013

Dowload Template Simple Login Hotspot Mikrotik

template simple login hotspot mikrotik

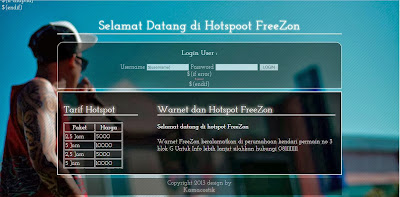
Template simple login hotspot Mikrotik. Ya lagi ga ada kerjaan dan sambil menunggu rasa ngantuk datang iseng-iseng ane buat template baru untuk login hotspot mikrotik. Template yang ane buat ini simple aja, ga perlu neko-neko heheh. Penggunaan gambarnya juga ga terlalu banyak hanya pada backgroundnya aja ya jadi lumayan ringanlah. walaupun tampilannya ga sebagus template-template yang udah banyak di internet. maklum lah ane ini masih newbie dalam mendesain template.

Pada template ini, ane hanya coba mempercantik tampilannya hanya dengan menggunakan css tanpa ada bantuan dari sotosop dan mba coreldraw. Sebenarnya tadi mau dipasangkan logo dengan effect animasi css3 tapi ya berhubung pantat ane sudah capek duduk, sampai disini saja deh desain templatenya :D. Pada tampilan judulnya ane cuman ngasih effect blur sama effect shadow biar kelihatan agak menyala gitu heheh. Selain itu background login, tarif hotspot dan info warnet ane kasih transparan dan ditambah dengan garis tepi warna putih.

Bagi yang minat template baru login hostpot mikrotik yang ada fitur slideshownya dan responsive klik link dibawah ini

Template Login Hotspot Slideshow dan Responsive Klik Disini

Jika ada yang berminat menggunakan template yang simple ini silahkan klik link download yang ada di akhir postingan ini dan gunakan cara ini untuk mengganti tampilan login hotspot ente. Ubah nama hotspot sesuai dengan nama hotspot sobat, sekalian dengan ubah tarifnya mas bro.

Selamat mencoba.

Download templatenya DISINI

NB. Silahkan Tinggalkan Email di Komentar Blogger Untuk di Kirimkan Passwordnya (Bukan Komentar Facebook) atau bisa add saya di Google + atau di Facebook

Saturday, December 7, 2013

Cara Mengetahui Skor atau Peringkat SEO Blog

cara mengetahui seo sebuah blog
Mengetahui rangking seo pada blog.  Sebagai bloger pemula saya sempat mempelajari mengenai seo. Walaupun sebenarnya penerapan seo pada blog saya ini belum sepenuhnya optimal.  Kemarin sempat blog walking tentang cara meningkatkan seo, eh malah ketemu website yang dapat mengecek tingkat seo pada blog. Alih alih ngecek seo blog ane, eh ternyata skornya sungguh sangat memilukan heheh cuman dapat skor 70+%. Ya sedikit demi sedikit di perbaiki dan sekarang hasilnya udah dapat 100%.

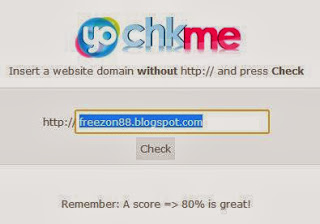
Untuk mengecek rangking seo pada blog sobat, sobat dapat mengunjungi web seo tools http://chkme.com/page-seo-toolsdan masukkan alamat url blog kemudian klik check. Tunggu beberapa saat sampai pengecekan selesai dan menampilkan skor seo blog sobat.

cara mengetahui skor seo pada blogspot

Jika hasilnya kurang memuaskan cobalah mengikuti pandungan yang diberikan di web tersebut. Mulai dari penggunaan tag h1, h2 pada heading atau judul blog, pemasangan deskripsi dan keyword blog, penggunaan deskripsi pada gambar dan lain sebagainya. Jika sudah memperbaiki kekurangan-kekurangan yang ada, cobalah kembali cek ranking seo sobat.

Dari hasil seo blog saya sebelumnya, ternyata penggunaan deskripsi dan keyword blog juga sangat berpengaruh pada skor seo ini. Selain itu gambar edit yang merupakan bawaan bloger juga mempengaruhi skor seo karena tidak memiliki title dan deskripsi.

Cara ini merupakan salah satu cara meningkatkan seo pada kode-kode html yang ada pada template blog. Jika mengalami kendala dalam memperbaiki rangking seo , sobat dapat mencari template blog yang seo friendly sama om google, udah banyak kok template seo yang tersedia di internet. Dan jangan lupa jika sudah memiliki template yang seo , pengoptimalan dalam penulisan artikel juga sangat berguna untuk  menambah tingkat seo pada blog.

Apabila hasilnya sudah memuaskan sobat dapat menempatkan skor seo sobat dengan mengcopy code hasil skor ke dalam blog dan tempatkan di widget, ya itung-itung sebagai motivasilah hehe

Selamat mencoba

Friday, December 6, 2013

Cara mudah membuat fanpage atau halaman fans facebook

Pengguna situs jejaring social facebook mungkin sudah tidak asing lagi dengan halaman fans facebook atau yang biasa disebut fan page facebook. Halaman fan page facebook biasanya dibuat oleh perusahaan-perusahaan besar, artis, komunitas, website, blog dan lain-lain. Nah sebagai bloger sobat juga dapat membuat fan page facebook blog agar supaya lebih dekat lagi dengan pengunjung setia blog sobat. Sehingga para fans atau pengikut halaman fan page sobat dapat mengetahui update terbaru dari blog.

Selain itu fan page facebook ini juga dapat meningkatkan traffic atau pengunjung pada blog. Semakin banyak yang like atau mengikuti halaman facebook sobat, semakin besar juga traffic yang dihasilkan. Mengingat bahwa facebook adalah salah satu situs jejaring social yang paling banyak penggunanya.
Dibawah ini adalah langkah-langkah membuat fan page facebook untuk blog


1.       Masuk ke akun facebook dan klik tombol pengaturan dan pilih buat halaman

cara membuat fan page facebook

2.      Pada tampilan buat halaman pilih merek atau produk, kemudian kategorinya pilih Situs Web dan dibawahnya masukkan nama fan page facebook sesuai dengan nama blog sobat. Klik mulai untuk melanjutkan.

cara membuat halaman fan page facebook

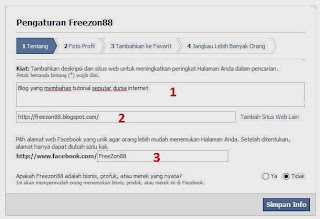
3.      Pada tahap selanjutnya ada 4 step untuk menyelesaikan pembuatan halaman facebook. Step pertama masukkan deskripsi blog anda (1) , alamat situs blog (2) dan alamat halaman atau fan page facebook sobat (3).

create fan page facebook

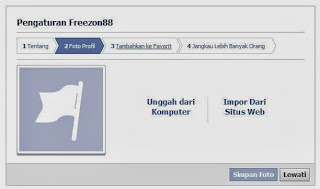
4.      Step ke 2 mengunduh foto profil, karena yang sobat buat adalah halaman untuk blog, jadi kita dapat mengunggah logo dari blog sobat dengan mengklik unggah dari komputer. sobat juga dapat mengimpor gambar langsung dari situs web atau blog dengan klik impor dari situs web.

cara mudah membuat fan page facebook

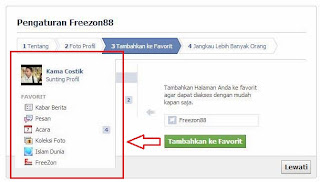
5.      Step ke 3 tambahkan ke favorit. Ini berfungsi agar halaman yang kita buat berada di favorit facebook sobat yang berada di beranda, sehingga sangat memperudah dalam mencari dan mengelolah halaman.

cara mudah membuat halaman facebook

6.      Step 4 jangkau lebih banyak orang, pada step ini dapat dilangkai saja

Setelah mengikuti step-step diatas sobat sudah dapat membuat halaman fan page facebook blog. Tinggal bagaimana mengelolah halaman tersebut dan mengundang pengguna facebook untuk menyukai halaman sobat.

Selamat mencoba.

Thursday, December 5, 2013

Redirect Halaman Login Hotspot Mikrotik ke Alamat web atau blog

redirect atau mengalihkan halaman login hotspot mikrotik
Redirect halaman login hotspot mikrotik.  Pada saat login hotspot mikrotik halaman yang dituju adalah halaman yang saat itu di jelajahi di browser. Namun disini kita dapat merubah redirect halaman login hotspot menuju alamat website tertentu. Seperti contoh ketika user memasukkan username dan password mikrotik kemudian klik login setelah user login maka akan dibawah ke halaman website tertentu.

Cara merubah redirect halaman login pada hotspot mikrotik adalah dengan cara merubah script html yang ada pada file alogin.html di folder hotspot mikortik. Untuk mengambil file alogin.html kita dapat menggunakan cara modifikasi tampilan login hotspot mikrotik. Sebelum merubah script file alogin.html backuplah terlebih dahulu file tersebut, sehingga akan mudah ketika mengembalikannya ke file aslinya ketika terjadi error. Namun menurut pengalaman saya hampir tidak pernah terjadi error ketika mengubah script pada alogin.html

info :
- Template Simple Login Hotspot Mikrotik Klik Disini
- Template Login Hotspot Slideshow dan Responsive Klik Disini

Ikuti langkah-langkah berikut untuk merubah redirect login hotspot mikrotik sebagai contoh saya membuat redirect ke alamat blog saya.

Buka file alogin.html menggunakan notepad ataupun aplikasi lain seperti dreamweaver, kemudian cari code <meta http-equiv="refresh" content="2; url=$(link-redirect)"> dan rubah tulisan yang berwarna merah dengan alamat url sebuah web atau blog. Contoh : <meta http-equiv="refresh" content="2; url=http://freezon88.blogspot.com">

Selanjutnya cari code berikut dibawah :

<script language="JavaScript">
<!--
    function startClock() {
        $(if popup == 'true')
        open('$(link-status)', 'hotspot_status', 'toolbar=0,location=0,directories=0,status=0,menubars=0,resizable=1,width=290,height=200');
                $(endif)
                location.href = '$(link-redirect)';
    }
//-->
</script>

Dan rubah tulisan berwarna merah menjadi alamat url web atau blog yang akan dituju ketika user login hotspot mikrotik.  Seperti contoh dibawah ini :

<script language="JavaScript">
<!--
    function startClock() {
        $(if popup == 'true')
        open('$(link-status)', 'hotspot_status', 'toolbar=0,location=0,directories=0,status=0,menubars=0,resizable=1,width=290,height=200');
                $(endif)
                location.href = 'http://freezon88.blogspot.com';
    }
//-->
</script>

Jika sudah merubah kedua code diatas, cobalah log out dari hotspot dan lakukan login kembali. Setelah melakukan login browser kita langsung menuju pada halaman web atau blog freezon88.blogspot.com


Selamat mencoba

Cara menampilkan widget di halaman tertentu pada blog

cara menampilkan widget dihalaman tertentu pada blogWidget yang terlalu banyak biasanya hanya akan memperburuk tampilan blog sendiri. Agar widget yang dipasang di blog lebih fleksibel kita bisa membuat widget tersebut muncul di halaman tertentu saja. Seperti menampilkan widget di halaman depan atau menampilkannya pada postingan tertentu.


Menampilkan widget pada halaman tertentu kita tinggal menambahkan conditional tags pada code html widget, namun harus sesuai dengan id widget tersebut. ID widget pada blog biasanya bertuliskan HTML1, HTML2, HTML3 dll. Tapi bagaimana cara mengetahui id sebuah widget? Ada beberapa cara yang bisa gunakan untuk mengetahui id sebuah widget. Cara yang biasa saya gunakan adalah dengan menggunakan add ons firebug. Dengan menggunakan firebug widget yang kita klik akan muncul id hmtlnya di jendela firebug seperti contoh diatas. Jika belum paham mengenai penggunaan firebug dapat mengikuti tutorialnya disini.

cara menampilkan widget di halaman depan blog


Atau dapat menggunakan cara yang paling mudah mengetahui id widget pada blog yaitu dengan hanya menempatkan cursor diatas icon edit widget tersebut. Sehingga akan muncul link di bagian bawah browser yang menampikan link ke widget tersebut. Pada link tersebut terdapat id widget. Perhatikan contoh dibawah ini :

mengetahui id widget blogspot


Setelah mengetahui id widget yang ingin ditampilkan di halaman tertentu, kita akan mencari id widget tersebut di blog kita dengan cara masuk kea kun blog pilih template dan klik edit html. Tekan CTRL+F untuk mencari id widget seperti contoh saya disini menggunakan widget feedjit dengan id widgetnya HTML8 pada blog saya. Jika sudah menemukan code id widget seperti contoh dibawah ini.


Kemudian tambahkan conditional tag <b:if cond='data:blog.url == data:blog.homepageUrl'> dibawah code <b:includable id='main'> dan tag penutupnya </b:if> sebelum code </b:includable>. Sehingga menjadi seperti contoh dibawah ini

</b:includable>
          </b:widget>
          <b:widget id='HTML8' locked='false' title='' type='HTML'>
            <b:includable id='main'>
<b:if cond='data:blog.url == data:blog.homepageUrl'>
  <!-- only display title if it's non-empty -->
  <b:if cond='data:title != &quot;&quot;'>
    <h4 class='title'><data:title/></h4>
  </b:if>
  <div class='widget-content'>
    <data:content/>
  </div>
  <!--<b:include name='quickedit'/>-->
</b:if>
</b:includable>

Code <b:if cond='data:blog.url == data:blog.homepageUrl'> berfungsi menampilkan widget di halaman depan atau homepage blog. Untuk menampilkannya di halaman postingan saja, atau tepatnya dihalaman artikel tinggal merubah code conditional tagnya sedangkan code penutupnya tidak perlu dirubah seperti contoh dibawah ini :

Menampilkan widget dihalaman depan (halaman utama Homepage)
<b:if cond='data:blog.url == data:blog.homepageUrl'>

Menampilkan widget dihalaman artikel atau postingan
<b:if cond='data:blog.pageType == "item"'>

Menampilkan widget dihalaman archive
<b:if cond='data:blog.pageType == "archive"'>

Menampilkan widget hanya di halaman tertentu atau artikel tertentu
<b:if cond='data:blog.url == "alamat url terntu"'>

Menampilkan widget dihalaman Statis
<b:if cond='data:blog.pageType != "static_page"'>

Save template dan refresh blog. Kemudian lihat hasilnya.

So jika ingin menggunakannya pada widget yang lainnya, cukup dengan cara mencari id widget tersebut dan ikuti cara diatas.

Selamat mencoba

Tuesday, December 3, 2013

Cara membuat komentar facebook dan blogger dengan model tab

membuat komentar facebook dan blog model tab
Membuat komentar facebook dan komentar blog dengan model tab. Pada artikel yang lalu saya sudah membuat cara memasang komentar facebook pada bloger namun dengan style yang berbeda.  Nah kali ini akan saya akan membahas membuat komentar facebook yang berdampingan dengan komentar blogger dengan model atau style tab. Seperti yang saya gunakan pada blog ini. Penggunaan model tab ini biasa digunakan pada sidebar blog seperti pada tampilan tab label, artikel populer dan archive.

Cara membuatnya hampir sama cara membuat kotak komentar facebook yang saya bahas dulu. Pertama-tama masuk keakun blogger pilih template dan klik edit html. Cari code html berikut dengan menggunakan CTRL + F

Baca Juga : Cara Menambahkan Widget Alexa Rank Pada Blog

<div class='comments' id='comments'>


Lalu copy code dibawah ini dan tempatkan tepat dibawah code html diatas


Jika sobat mempunyai fan page facebook cari kata IDFANPAGEFACEBOOK pada code diatas dan ganti dengan id fan page facebook anda.

Baca Juga : Cara Submit Sitemap Blog Ke Search Engine Google

Save template dan refresh blog anda. Jika komentar facebook belum muncul coba cari kembali tag <div class='comments' id='comments'> dan tempatkan lagi code komentar facebook dibawah tag tersebut. Karena pada saat saya memasang komentar facebook dengan model tab ini saya menemukan dua tag html tersebut dan kedua-duanya saya tempatkan code komentar facebook.

Selamat mencoba
Sunday, November 24, 2013

Cara Mudah Menggunakan Rumus Perbandingan di MS Excel

Tutorial belajar menggunakan rumus perbandingan di ms excel. Untuk membuat rumus perbandingan di ms excel kita menggunakan rumus IF. Nah kali ini saya akan menjelaskan bagaimana cara mudah untuk menggunakan fungsi rumus IF di Ms Excel. Misalnya kita akan melakukan 2 perbandingan, coba simak pernyataan dibawah ini dan akan kita gunakan sebagai perbandingan.
"Jika Nilai rata-rata murid lebih besar dari 70 dinyatakan lulus dan jika dibawah nilai 70 akan dinyatakan tidak lulus."

Dari pernyataan diatas, kita akan mendapat DUA perbandingan yaitu perbandingan jika nilai diatas 70 dan nilai dibawah 70. Nah cara mudah menggunakan rumus IF adalah jika terdapat 2 perbandingan maka kita hanya menggunakan satu fungsi IF, jika 3 perbandingan kita menggunakan dua fungsi IF dan jika 4 perbandingan kita menggunakan 3 fungsi IF, begitu seterusnya. Sebenarnya jika terdapat dua perbandingan kita dapat menggunakan rumus IF dua kali namun sangat tidak efektif dan penulisan rumus yang terlalu panjang.

Baca Juga : Penyebab Rumus Pada Excel Tidak Otomatis Melakukan Perhitungan

Untuk lebih jelasnya kita akan membuat contoh 2, 3 dan 4 perbandingan.

1.  Dua perbandingan

Pernyataan : Jika nilai rata-rata murid lebih besar dari 70 maka dinyatakan lulus dan dibawah 70 maka dinyatakan tidak lulus

penggunaan rumus perbandingan di ms excel

Rumus yang digunakan pada kolom KET adalah =IF(B2>=70,”LULUS”,”TIDAK LULUS”). Cara membaca rumusnya adalah (IF) Jika nilai pada kolom B2(>) lebih besar atau (=) sama dengan 70 maka dinyatakan lulus(“LULUS”) namun jika nilainya dibawah 70 maka dinyatakan tidak lulus(“TIDAK LULUS”). Lihat penggunaan fungsi IF diatas, karena kita hanya melakukan 2 perbandingan saja maka fungsi IF yang digunakan hanya satu.

Info : Untuk membandingkan dua buah pernyataan yang harus terpenuhi dapat menggunakan Fungsi Rumus Perbandingan And

2. Tiga Perbandingan
Pernyataan : jika murid kelas A jurusan IPA, murid kelas B jurusan IPS dan murid kelas C jurusan Bahasa
fungsi rumus IF di ms excel

Rumus yang digunakan pada kolom KET adalah =IF(B2=”A”,”IPA”,IF(B2=”B”,”IPS”,”BAHASA”)). Cara membaca rumus adalah (IF)Jika kolom B2 adalah A, maka KET adalah IPA, dan (IF) jika kolom B2 adalah B maka KET adalah IPS dan jika kolom B2 bukan A dan B maka KET Bahasa. Karena terdapat tiga perbandingan maka kita menggunakan fungsi rumus IF dua kali.

Baca Juga : Penggunaan Rumus OR dalam Perbandingan di Ms Excel

3. Empat Perbandingan
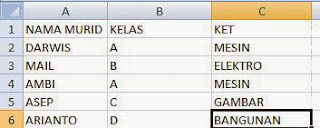
Pernyataan : jika murid kelas A jurusan Mesin, murid kelas B jurusan Elektro, murid kelas C jurusan Gambar dan murid kelas D jurusan Bangunan

belajar menggunakan rumus perbandingan di ms excel

Rumus yang digunakan pada kolom KET adalah =IF(B2="A","MESIN",IF(B2="B","ELEKTRO",IF(B2="C","GAMBAR","BANGUNAN"))). Cara membaca rumus adalah (IF)Jika kolom B2 adalah A, maka KET adalah MESIN, (IF) jika kolom B2 adalah B maka KET adalah ELEKTRO, (IF) jika kolom B2 adalah C maka KET adalah GAMBAR dan jika kolom B2 bukan A,B dan C maka KET Bangunan. Karena terdapat empat perbandingan maka kita menggunakan fungsi rumus IF tiga kali.

Contoh diatas kita telah membuat tiga contoh perbandingan dan menyelesaikannya dengan menggunakan fungsi IF. Sebenarnya bagaimana cara menggunakan rumus fungsi IF tersebut. Coba sekali lagi perhatikan rumus dibawah ini 

cara mudah membaca rumus perbandingan di ms excel

Ketika kita akan menulis fungsi rumus IF maka akan muncul keterangan pembantu seperti gambar diatas. Logical_test merupakan kata atau kolom yang akan dilakukan perbandingan, value_if_true merupakan pernyataan jika perbandingan pada logical_test benar dan value_if_false adalah pernyataan jika perbandingan pada logical_test bernilai salah.

Nah mungkin sampai disini kita sudah sedikit paham tentang bagaimana cara menggunakan fungsi rumus perbandingan pada ms excel.

Semoga bermanfaat.

Friday, November 22, 2013

Cara Memasang Breadcrumb di Blog

cara memasang breadcrum pada blog SEO
Tutorial memasang breadcrumb di blog.  Salah satu cara meningkatkan seo pada blog adalah dengan menambahkan fitur breadcrumb pada blog, inilah yang saya temui ketika mencari salah satu cara untuk meningkatkan SEO. Yah akhirnya saya juga memasang fungsi ini pada blog saya. Menurut beberapa sumber fitur ini membantu artikel agar mudah terindex oleh mesin pencari. Namun ada juga yang mengatakan bahwa fungsi ini tidak cocok untuk SEO. Nah ini terserah dari sobat, mau memasang fungsi ini atau tidak.

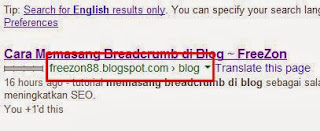
Setelah saya memasang fungsi ini, ketika melakukan search pada om google, ternyata fungsi ini terlihat juga pada search engine, seperti contoh gambar diatas beberapa artikel saya yang tampil di search engine google terdapat breadcrumb.

Breadcrumb merupakan link –link label yang menuju pada artikel yang dibuat. Berikut contoh tampilan breadcrumb pada blog

Home>>office>>excel>>belajar ms excel


Untuk memasang breadcrumb masuk ke dasbor blog anda, kemudian pilih menu template dan klik edit template. Pertama-tama masukkan style dari breadcrumb cari kata ]]></b:skin> kemudian copy style dibawah ini dan tempatkan diatasnya


Setelah itu cari code berikut <b:includable id='main' var='top'> dan gantikan dengan code dibawah ini 


Save template dan lihatlah hasilnya pada google, jika belum muncul cobalah menunggu untuk beberapa hari. Menurut ane fungsi ini tidak langsung tampil di google pada saat kita memasangnya, butuh waktu agar breadcrumb muncul di search engine.

selamat mencoba :)

Wednesday, November 20, 2013

Cara Membuat Animasi Timer menggunakan Adobe Flash

animasi timer pergantian angka adobe flash cs6
Tutorial cara membuat animasi timer atau animasi pergantian angka dengan menggunakan adobe flash cs6. Kali ini saya akan membahas tentang bagaimana cara membuat animasi timer. Animasi ini berbentuk perubahan angka, dapat berupa pertambahan angka atau pengurangan angka. Contoh animasi ini seperti yang biasa kita lihat pada saat mulai pemutaran sebuah film di bioskop, pada saat memulai sebuah pertandingan balap dan lain sebagainya.


Langkah-langkah membuat animasi timer


Buka adobe flash dan buat lembar kerja baru dengan menggunakan action script 3. Ubah dahulu nama layer menjadi Angka. Pada layer Angka buatlah angka 5 dengan menggunakan Text Tool (T) atau dengan menekan tombol T pada keyboard. Kemudian klik kanan pada frame 5 dan pilih insert keyframe, lakukan hal yang sama pada frame 10, 15 dan 20 hingga Nampak seperti gambar dibawah ini :

cara membuat animasi timer

klik pada frame 5 dan ubah angka 5 yang ada pada lembar kerja menjadi angka 4

Klik pada frame 10 dan ubah angka 4 menjadi angka 3 pada lembar kerja

Klik pada frame 15 dan ubah angka 3 menjadi angka 2 dan terakhir klik pada frame 20 kemudian ubah angka 2 menjadi angka 1 pada lembar kerja

Untuk menjalankan animasi tekan CTRL + ENTER pada keyboard

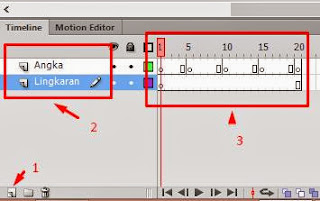
Selanjutnya kita akan membuat sebuah objek lingkaran yang berkurang ketika animasi timer tersebut di jalankan. Perhatikan gambar dibawah, pertama-tama buatlah sebuah layer baru dengan mengklik new layer (no 1 pada gambar), ubah nama layer menjadi Lingkaran dan tempatkan dibawah layer Angka dengan cara klik tahan dan geser kebawah (no 2 pada gambar).

animasi timer adobe flash cs6

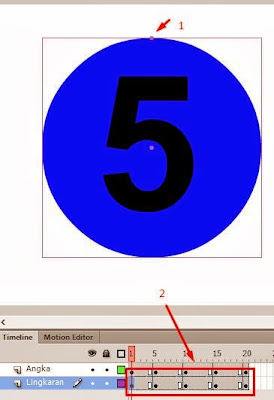
Pada layer lingkaran klik frame 1 dan buatlah sebuah objek lingkaran dengan menggunakan Oval Primitive Tool (T) atau tekan tombol T dan tempatkan sejajar dengan angka 5. Kemudian klik menu modify – transform – rotate 90 ccw (CTRL + SHIFT + 7) agar node lingkaran yang sebelumnya berada disamping kanan, pindah kebagian atasi lingkaran.

Selanjutnya Lakukan hal yang sama pada layer Lingkaran yaitu menambahkan keyframe pada frame 5, 10, 15 dan 20 dengan mengikuti panduan yang sama pada layer Angka yang telah dibahas diatas, hingga tampilannya seperti no 2 pada gambar dibawah.
Contoh gambar dibawah :

animasi timer pergantian angka adobe flash cs6

Langkah selanjutnya masih pada layer lingkaran, klik frame 5 dan klik objek lingkaran sehingga muncul menu oval option pada property yang berada disebelah kanan lembar kerja, ubah nilai dari start angel menjadi 90 sehingga seperti gambar dibawah ini

animasi timer pergantian angka adobe flash

Dengan mengikuti panduan diatas pada frame pada frame 10 nilai start angel ubah menjadi 180, frame 15 nilai start angel 270 dan pada frame 20 ubah nilai start angel menjadi 359. Untuk menjalankan animasi tekan CTRL + ENTER. Untuk mengubah kecepatan animasi ubah fps lebih rendah dari nilai standart 24
Selamat mencoba
Tuesday, November 19, 2013

Cara mudah print label undangan di ms word menggunakan database ms excel

Print label undangan dengan menggunakan ms word dan database ms excel. Kali ini saya akan membahas bagaimana cara membuat label undangan dengan penggabungan ms excel dan ms word. Fitur yang akan saya akan gunakan disini adalah dengan menggunakan fungsi mailings pada word dengan database menggunakan ms excel. Dengan menggunakan fitur ini akan sangat mempermudah dalam memprint label undangan yang datanya ratusan bahkan sampai ribuan.
Cara membuat label undangan dengan menggunakan fungsi mailings dengan format VIDEO TUTORIAL LIHAT DISNI atau dapat mengikuti panduannya dibawah ini :

Baca Juga : Teknik Mengatur Margin Untuk Print di Ms Word Klik Disini

Buatlah database nama-nama para undangan di ms excel, dengan judul kolom nama, alamat dan status, dan simpan dengan nama file dblabel, seperti contoh dibawah :

database label undangan di ms excel

Buka ms word dan buatlah table dengan 2 kolom dan 5 baris sesuai dengan ukuran label yang akan digunakan, agar table sesuai dengan label, lakukanlah test print pada label lihat contoh dibawah. Atau dapat mengikuti Panduan Membuat Label Undangan di Ms Word

label undangan di ms word

Setelah membuat table label di ms word kemudian klik menu mailings – Step by step mail merge wizard.. maka akan muncul menu mail merge disebelah kanan lembar kerja ms word.  Perhatikan pilihan paling bawah, terdapat 6 step pembuatan mailings.

Pada Step 1 pilih next:starting document
Pada step 2, biarkan pilihan default use the current document dan klik Select recipients
Pada step 3, biarkan pilihan default use an existing list dan klik browse, cari file dblabel excel yang telah dibuat tadi, jika muncul jendela konfirmasi select table dan mai merge recipients klik saja ok. Dan klik next : write your letter
Selanjutnya klik next dari estep 4 hingga step ke 6 dan close/tutup jendela mail merge yang berada disebelah kanan lembar kerja

Tahap selanjutnya kita akan memasukkan nama , status dan alamat yang ada pada file excel dblabel ke dalam tabel yang telah kita buat di ms word. Blok satu persatu kata nama yang ada pada tabel kemudian klik menu mailings – insert merge field (no 1 pada gambar dibawah)  – dan pilih nama, begitupun dengan kata status dan kata tempat namun pada pilihan insert merge field pilih status untuk kata status dan alamat untuk kata tempat. Jika benar maka tampilannya akan seperti gambar dibawah ini

tutorial cara print label undangan di ms word

Perhatikan gambar diatas, sebelum kata <<nama>>terdapat text <<next record>>  yang ada pada tiap kolom kecuali pada kolom pertama. Teks tersebut berfungsi agar data yang ditampilkan di kolom-kolom berikutnya adalah data yang ada pada baris selanjutnya yang berada dalam file excel dblabel. Untuk melihat hasilnya klik preview result (no 3 pada gambar diatas). Cara menambahkan test next record adalah dengan mengklik Rules (no 2 pada gambar diatas) dan pilih next record, lalu tempatkan tepat di depan kata <<nama>>.

Langkah terakhir adalah melakukan print label. Untuk memprint semua data nama-nama undangan yang ada pada file excel dblabel kita menggunakan menu finish & merge (no 4 pada gambar diatas) dan pilih print document.

cara print label undangan di ms word

Pada tampilan jendela merge to printer, all untuk memprint semua nama-nama yang ada dblabel, current record hanya memprint data yang tampil dilembar kerja ms word sedangkan pilihan from adalah pilihan print jumlah nama-nama undangan.

Bagi sobat yang menginginkan FILE LABEL UNDANGAN seperti diatas yang sudah jadi, dapat mendownloadnya DISINI

Sampai disini kita sudah dapat dengan mudah membuat label undangan dan cara memprintnya hanya dengan menggunakan satu halaman pada ms word dan menggunakan database yang ada pada ms excel.
Semoga cara ini dapat membantu sobat dalam membuat label undangan

selanjutnya akan saya buat tutorial CARA MEMBUAT UKURAN LABEL UNDANGAN DI MS WORD

Monday, November 18, 2013

Important Information Concerning How A Digital Printer Functions

By Aaron Feldman


Reproduction of materials requires use of machines. This machine is known as a digital printer. It has the ability of reproducing various types of documents including photographs. They come in several designs which can be used in various ways and forms. The press requires them to carry on with their activities well. Thus, they are very useful and important in several ways.

Users have a wide range of press devices available for production of press documents. Most of them are made in a technology that enables them to produce electronic files and dots. Dry toners, laser devices and inkjet machines are mostly common in different press companies. They are automatically synced with computers that smoothly produce finished images.

The first step is conversion of the images or photos which is done via pressing. This way, the computer has an ability to read the instructions and follow them accordingly. The images and photographs are pressed into a readable form which the computer can easily be able to convert the ideas to a more useful form. Pressing is made possible by the use of software and programs which have been installed inside the machine. One uses other devices for instance scanners to feed this information into the computers. You may also use other external memory storing devices like flash disks and memory cards.

The laser devices used work using technology that produces pulses of light beams. Images are then created on light sensitive surfaces by the use of x rays. Dot matrix can also be used. This is by making dots which are formed in the form of images. The principle of attraction of charges can also apply in this case.

Inkjet devices use small droplets of ink in press documentation. Press papers use this technology to produce documents. Droplets are automatically controlled in three different types; continuous drips, thermal drops and electronic flow that is produced on demand. Ink is forced out of cartridges onto press papers being used.

Droplets being emitted are usually in very small microns. For quality work, inkjet press devices are recommended for press work. They produce documents in photographic nature and quality. It is for this reason that most households and press companies do use them. However, inkjet devices are usually expensive when being procured unlike laser or dot matrix devices.

There are several benefits of having press devices. Those who work in busy places require them since they aid in time saving. They are very fast and very economical as well. This is because they require use of fewer resources. A lot of materials can be used for carrying out this work including clothes in the textile industry. Experts in the press industry also require them.

Things like dust must be kept away from the devices. Other environmental factors that may affect it must also be kept away. This will go a long way in making sure that the digital printer is safe. Thus, it is very important.


About the Author:


Benefits Of PC Service Atlanta

By Sonya Riley


Owning a computer does make work faster. Almost every home across the globe owns a computer or several for the family to use. It is interesting to note that even small children know how to operate these gadgets.Owning a PC can be and is also very exciting. PC service Atlanta are numerous should be identified on the basis of credibility and professionalism.

Handling bulky work does require installation of antivirus and spy ware software. Keeping off bugs that are a nuisance and a danger to the PC is inevitable to avoid damage to it. Keeping your documents and files safe is also important to avoid spies who want to know your business secrets or want to steal your clients. Both individuals and organizations are becoming aware of this very key software and are ensuring that they are fixed in their machines.

Slow working of the PC does not mean that you have to quickly get rid of your old one and buy new one, but rather take it for service. The problem could easily be fixed by taking it for repairs where it will be thoroughly checked. The affecting issues can due to dirt which can be quickly removed. Too many files that are not being used can be removed from the hard disk so that they can open faster.

Updates of various systems are done to help one use many applications depending on the type of work one has. Every time there is a new antivirus or spy ware in the market, users rush to try them out hoping that it will work well than what they have currently.

General diagnostics by a professional provider is a great idea if you do value the investment made on making your work much easier. Once you have identified a reliable and competent professional, you can have your machine checked regularly. This way you are assured that you can work without major interruptions to your work due to breakdowns or some other malfunction. It is amazing to discover what is actually found in your computer during the checkups.

Users will most probably not have a problem buying a new PC or laptop, but finding a company that will provide great service can be a bit challenging. This is where referrals are used to get information on past jobs done.

Credible companies can be found in the yellow pages or in the media. It is important though to do your homework well so that you do not get disappointed by a shoddy job. A great service can easily be noticed from referrals from people you know well.

professional PC service Atlanta has very many providers that are readily available. They can be picked from referrals from friends and family. Do you have a PC that you have not taken for repairs. It would be a good idea to start now.


About the Author:


Responsibilities Of A Computer Repair Technician

By Sonya Riley


The computer repair in Milwaukee WI typically work in support positions having the main responsibility of taking good care of computer problems. They do the maintenance as well as the treatment whenever a problem arose. They are working anywhere from the backroom of a large corporation to the front help lines for almost all the computer manufacturers software companies.

Being a technician with these devices, not everyone is required to go to college and get a degree. As long as you know the nuts and bolts, and the advanced things so that it can be treated, then all is good. However, some companies require their workers to get a degree first before they apply.

Having a network certifications is also a plus points. All for the reason that a person will be proven effective as a worker. And as an employee who can handle the pressure and could treat the problems that were diagnosed in a certain electronic device. All because he was cultivated to do so.

You are an all round in this kind of job. Meaning, you do not just sit and then avoid the viruses from perpetrating your computers. You are the overall in charge of running the device that requires quite a skill and knowledge to know the bits and information about the work, you have to read below .

Just like other things, the in charge is needed to assemble the parts. To connect and to ensure they are going to function really well. So in this matter, it is the responsibility that they play to ensure that all parts are connected to the computers. They are in charge that they also perform these analysis too.

It is the role that they play to ensure they have checked all the performance related issues that rise and were seen. They immediately respond to the issues that they have encountered. They also give the technical advice in regard to the issues that was seen or rather diagnosed. Over all, they solve the issues through the use of the telephone or in personal where they talk face to face with the client.

One of the primary responsibilities that you have is to make sure you are installing the new software or hardware in your company. All kinds of tools that are needed for such company. They are needed so that the said organization or company you are working with is going to perform the necessary device to a bunch of their clients or customers.

They are on call for a wider range of issues that employees have in regard to their computers. Although this could be analyzed through the network, there is still the need to interact with the employees. It is advised that a person will check the systems in a regular basis throughout the company.

Indeed, the computer repair in Milwaukee WI is no ordinary. You will face the everyday problems that are encountered by numerous people. Even superman can not do that and can not treat these issues. However, whenever a person decided to enter this world, he has to have an overflowing patience. All for the reason that some problems may take a while before they were recovered or treated fully.


About the Author:


Comparing Plans For Unlimited Nationwide 4G Vs Unlimited

By Leslie Griffith


You want to be able to sign up for the right data plan for your phone. You know that you are really likely to use such a feature in your phone and you would want to be able to get signed up for the right deal. You want to choose right, so you have decided to compare different plans for unlimited nationwide 4g vs unlimited that you can take advantage of.

Many people these days are quite delighted to know that their phones' usage are no longer really limited to test messages or to calling anymore. Aside form being used for communication purposes, many phones these days can now be used to access the web. So, having the appropriate plan for such a feature is going to allow one to be able to maximize the sues of these devices.

One of the reasons why people should be able to get the right data plan is the fact that they can actually insure additional charges if they are not too careful. Causal data usage on a phone can be an additional charge for your bill especially if you are on a plan where this feature is actually not included. To avoid surprise figure son your bill the next cycle. It is best to get the right plan beforehand.

Have a good understanding of the plan that you're going to be subjected to before you decide to sign up for these services. Remember that there are going to be a lot of available plans that may be made available around. Try to have these plans successfully reviewed. They may have underlying terms and conditions in them. Get to know what they are first before e signing up.

Determine the many available choices that you have first before you decide on singling out a specific plan and signing up for it. It is always easier for you to decide and to choose right once you take the time to look around and assess what you can get out of the different choices that you have. Always ask about what is in it for you to allow you to choose better this time.

Determine the offers that can be extended to you by the service providers that are currently available around too. It is always helpful that you have these choices you have taken into account first before you make a final choice. Opting for the most appropriate choice there is would be a lot easier once you have taken the time to review their upsides and their downsides.

Have your needs properly assessed as well. You need to see to it that the requirements that you have is going to be met by the features that you will be adding to your phone plan. In addition, see if it is going to affect your subscription in any way, or if there is some sort of lock in period where you have to stay with such a plan as is required by your service provider.

It matters too, that you will ask a lot of questions. You want to be able to make the right comparisons between the different plans of unlimited nationwide 4g vs unlimited. You need to understand what is exactly that you will be getting. Ask questions about the contract and make sure you know what you are getting into before you will decide on such an offer.


About the Author:


Sunday, November 17, 2013

Get To Know The Benefits Of Architecture Project Management Software

By Alyce Powell


There a lot of benefits of using Architecture Project Management Software because one is able to achieve a lot of things within a very short period of time. Normally machine work cannot be compared to the work done by human beings. This is because one thing human being has the thinking thing thus they have a lot to worry about. What they do is that they get to be in their working place but in their mind they are thinking about other things. What happens is that some people are always much stressed with a lot of things.

When it comes to buying of Architecture Project Management Software there is need to know that one should buy which can be shared among many users. This is because the program itself is very expensive as if that is not enough it need a lot of training for one to use it. If one buys a program to share it will be of benefit.

In the society people are in they have most of the work done automatically. A lot of embedded systems are available to all the people who are willing to buy them. They are affordable because the work they do cannot be equivalent to the service they offer. The best thing about such systems is that they do not require to be paid at the end of the month is it happens with most human beings.

There is needed to also go for the previous version of that program. There is need to be very aware that most of the new versions of the program or systems that come up do not mostly have all the features which were of benefit to the person who was doing it initially. This applies even with the operating system. Therefore always use the previous version of the program that work on until there is another release such that one is two steps behind in the upgrade they can now upgrade to one step.

When it comes to construction of any real good house one has to have a drawing of that house. There are engineers who are taught how to draw the houses. One has to be very good in drawing to pursue the career. It is very important to know the need of doing good things and getting good money.

If one decide to just build a house without the use of this engineer who look more about the soil they end up having loses. The person may build a house which the soil cannot hold. What happen is that they end up in a lot of problems like they do not do any other things part from being in that place and the house start to have cracks.

At this point one sees the mistake they did. But it is too late they have nothing to do. Then the whole building collapses within a very short period of time thus loss.

When on get to know about Architecture Project Management Software they also know why they should get the building in a paper by drawing. This is no longer done by use of pencil. There are programs that are used making the drawing so real.


About the Author:


The Benefits Of Electronic Design Consulting Services

By Katrina Wheeler


Electronic design consulting services sets up a good structure for exchange that will enable and limit the interaction of every detail. In similar undertaking, the beliefs about consulting shape the practices with customers thus enabling and limiting the results being produced. The customers must choose consultative service.

This approach is according to the beliefs of each expert in consultation. Their knowledge is valuable enough for you to improve how they are offered. Trust the consultants as your resourceful partners in running the company. Their works will begin in processing details to understand what you need and want.

The clients must provide knowledge as well about the results that will greatly benefit them in various ways. This wide understanding will improve not just the number of customers but the quality of services as well. Your relationship with the consultant must be strong as ever to tackle about the things to be accomplished.

From the time perspective, it is the major pillar to support and build a relationship. The services will offer you benefits. The firm will engage lots of specialists to accomplish happening worthy of your memory. It must be goal oriented and mostly about scientific and economic factors that will surely help the company.

Not only the project but also its related problems and together come up with effective options to benefit the firm. The best part of it is the number of minds that will take part in debating, deliberating and constructing a good solution. This is not possible when you only work with an engineer. This constitutes not just engineers but also other experts in the field.

When the experts work together under a particular consultant, the collaborative effort with the most important factors will contribute to the success of every project that is taken into account. The basic concept is helping the firms in meeting the design and other construction needs. The requirements are in range from the simplest to the hardest part of it.

The consultants offer various services to build engineering and also science that will include assessment, inspection, plans and repair of every structure and a lot more. The firms will use the best quality software online. It will be used to create assemblies then assessments. There is an advanced engineering consultation that will be offered depending on your needs and wants.

Usually, a modern consultation encompasses everything from the basic tasks to the main and the harder parts of it. They are more on improving the business done with the clients and in providing the necessary solutions. It is the responsibility of the consulting firm to take the steps to popularize the service. They carry out an intensive research on how to improve the marketing and to identify other potential business.

There are lots of reasons why many choose to acquire electronic design consulting services. It will help plenty of individuals to work hand in hand in understanding what must be understood and so on. Choose to hire an effective consultant to provide you the necessary consultation that are simple and cost effective.


About the Author:


Tips About Broadcasting Music Through The House

By Marta McBrian


In this post, I'm going to examine various options for placing audio inside a number of locations of your home. Primarily, I'll review several multi-room music systems and also offer several ideas for installing the most important components. I'm going to clarify a few of the fundamentals of multi-room audio. In particular, I will present some of the obstacles of sending music to multiple locations. Last but not least, Let me make clear how present-day systems tackle these types of challenges plus offer some recommendations on setting up those kits.

If you are hoping to set up music in a number of rooms of your property then you're lucky. You will find several systems on the market including Sonos wireless audio products, Logitech's squeezebox, Creative Lab's wireless transmitters to name a few. Your current budget along with your specific demands are going to pinpoint which product is ideal for you.

Today's audio distribution systems convert the music into information. The data is routed by means of a network protocol. Most of today's music systems support wired LAN internet connections. Assuming you have a LAN cable connection in your property then you can attach these types of models directly to your home network. Each of the parts can plug into an Ethernet port and transmit or receive audio through the network. On top of that, various systems include a wireless network or the choice of attaching wireless expansion modules. It is worthwhile considering whether to go with a product which has wireless broadcasting. If you already have a wired LAN network at home then you can certainly save some cash by buying a product without wireless broadcasting. If you do not have a LAN though then you'll have to pick a system that is able to transmit music wirelessly. In the event you select a system that allows you to add in a wireless expansion module then you can easily save some money by not attaching a module in such locations in which you do have a wired LAN cable.

To install the product, you will need web access in case you are broadcasting from an internet radio station or other online sources. Should you be broadcasting from a local device then you simply need a home network. A few products offer iPod device docking stations that permit streaming of content that is kept on an Apple portable gadget. If you are considering playing music from your PC then various systems necessitate that you share those audio directories on the LAN as a way to enable access to the multi-room music system. Next, you have to install an application on your PC or a portable device that allows you to control your system. Some systems also offer a dedicated remote. When you are on a budget then you may prefer installing an app on a gadget that you already own.

Setting up and controlling music zones is a key feature of multi-room audio products. Each speaker in the house is assigned to one zone. All loudspeakers in one zone play music from a single audio source. A zone may be a single space or a number of areas grouped collectively. Arranging two wireless receivers together into a zone allows you to create a pair of speakers which are spaced pretty far apart as stereo speakers. If a pair of speakers are grouped together, it makes sense to arrange one speaker to output the left and the second speaker the right audio channel. Through spacing the two speakers fairly wide apart, the stereo effect may be improved. Furthermore, you can organize home entertainment speakers in a similar fashion. When acquiring a music product, check the technical specifications in order to determine whether or not the sound of all loudspeakers within a zone is going to be in sync. Put simply ensure that there isn't any delay among the audio playing from different speakers. This sort of delay could degrade the audio.


About the Author: